Welcome!

This is my place to share my creative bits and pieces. My art has no rules, no limits and absolutely no order. My projects change with my moods but for the last few years, my main focus has been paper art. Cards, collage, mixed media and as many techniques as I can get to. My inspiration comes from everywhere.

I hope you enjoy your visit.


Showing posts with label Christmas cards. Show all posts

Thursday, December 12, 2013

CHRISTMAS IN THE AIR

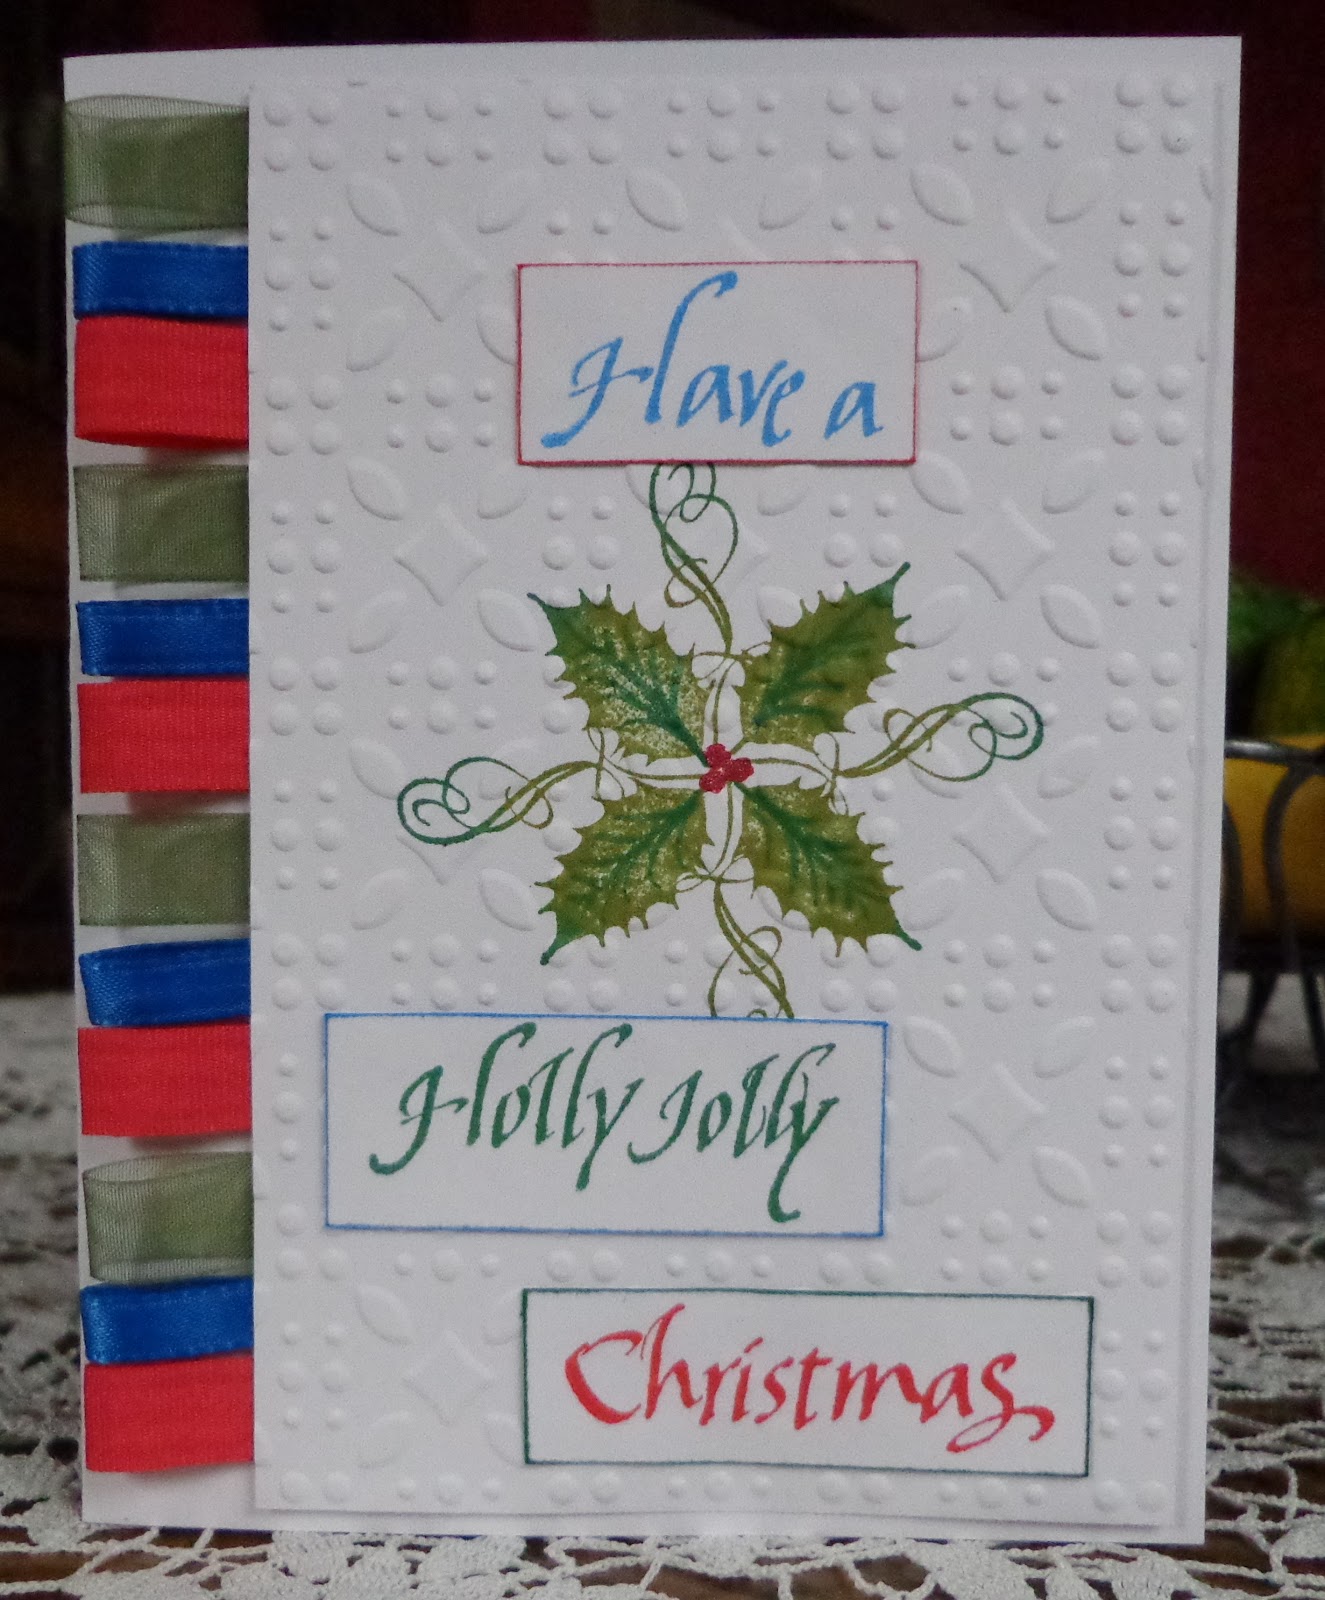
Hi Everyone! This card came from my scrap pile! I was tidying my work space yesterday and any bits and pieces, I tossed to the side. Once done, I realized that a lot of the pieces looked good together, so I added the sentiment and put it all together. The faux mosaic tile strip was something I'd done weeks ago and never really liked with anything I chose for it. So, it got pushed aside. Now, I love how it works with the vibrant red. I think I should work from a scrap pile more often.

This tag design from Quietfire Design, is a lot of fun. I've kept the 'decorating' very simple on them, especially the two on the left with the cut out text.
 
I hope all your plans and projects are going well.
Thanks for stopping by!
 

Monday, November 18, 2013

ONE SHEET WONDER 16 CARD STASH BUILDER

Hi everyone!
Does making 16 cards in a couple of evenings, or one good afternoon session, sound good to you?
Then, go on over to Quietfire Creations right now, and you can find out how.
I hope you enjoy the tutorial.
Thanks for looking!

Thursday, December 13, 2012

EMBEDDED EMBOSSED MITTENS

When I changed a card awhile ago, I was left with the strip of mittens I'd trimmed off. After stamping a few festive words in equally festive colours, I glued the mittens to the edge of the card stock. Then I embossed it and attached it to a card base. Looks a little windy!
The stamps are all from Quietfire Design and on special-go get some!
 
Thanks for looking today!
 

Thursday, December 6, 2012

STENCIL & PUNCH & DIE....OH MY!

Once again, I am pleased with simplicity. This card began with a scrap on my work table.
The top layer, before I stamped it with the sentiment, was a piece I'd put aside after flipping my stencil onto it. Whenever I stencil, after using it on my project I like to lightly mist it and flip it onto cardstock to print the negative. The print here is subtle because the colours used were so pale. The piece was stamped then trimmed and the corners were punched.
This was layered onto the dark die-cut square, which was then adhered to the card base.
 
Quietfire Design has Christmas goodies on sale!
 
Thanks for stopping by and I hope your day is FABULOUS!

Tuesday, December 4, 2012

HOLLY JOLLY RIBBONS

Is it any surprise that the technique used here is called "ribbon tabbed borders"?
So simple to create, and so striking. I repeated the ribbons down the side but I also could have used all different ribbons, as long as the colours matched the card. I could have added some white too. The only rule I imagine would be to match the colours in the card.
I really like the look of the looped/folded ribbon but have seen it done with cut flat pieces and that looks good too. Now, we have another way to use up those ribbon scraps. yay!
Here's a closer look at the stamped holly. I used the rock 'n roll technique to ink up the stamp -apply lighter colour to stamp, then tilt it so only the edges pick up darker ink. The veins were painted on with a fine brush and the darker ink.
 
The stamps, Distress inks and embossing folder can all be found at Quietfire Design.
 
Thanks for looking today!
 

Thursday, November 29, 2012

IT'S A PROCESS...and a MOOD!

Crazy title for this post? Yes, but it fits. This morning as I looked over my work table, I saw bits and pieces and thought I had a good plan for putting them together. Awhile later, this card is the result. While I love each of the stamps, (Quietfire Design) I wasn't sure this worked. I was going for the 'family' theme and relating it to the row of mittens, similar to the family stockings on Christmas Eve. I think, it works better if you know that but this is not a talking card and the receiver wouldn't know that. So.....
I messed about created some more and made this card.
I like it more than the first one. Here's a look at the shimmer on the dots...
Super Sparkle acrylic paint is my 'go to' for shimmer. To tint it, I first applied the Fired Brick ink pad to a corner of my acrylic stamping block. Then I picked up a drop of Super Sparkle with my stylus, mixed it in with the ink on the block, then dotted it onto the card stock. If I had the ink in a re-inker, I would have used a little drop of that to mix with the Super Sparkle, but I don't so this works. I can make the shimmer paint any colour that I have in inks.
Tomorrow, I may look again and prefer the first card-never know what mood will strike or when :)
It certainly keeps things interesting.
 
Thank you for looking and I hope you're enjoying the day.


Tuesday, November 27, 2012

SNOWFLAKES

I have snowflake stamps and distress inks and sparkly spritz- and couldn't be happier about it!
Quietfire Design has just released a new stamp set and it's gorgeous. This card shows only two of the six stamps in the set. If you look at Quietfire Creations on Wednesday, you'll see a little more of it.
 
This card uses a technique called Distressed Spritz. Distress Inks are sponged onto the cardstock, then a Lace Border stencil was placed along the bottom edge and shimmer mist was sprayed over it. As it dries, the ink fades where it was wet, leaving a mottled, distressed look. The snowflake stamp was lightly sprayed with water and stamped a couple times. The rest of the card was completed, then spritzed with a little more shimmer spray.
 
Winter/Christmas/Holiday cards are so  much fun to glitz up.
What's your favourite for bringing on the shine?
 
Thank you for stopping by and have a wonderfully creative day!

Friday, November 23, 2012

CHRISTMAS SHINE

My card today is subtle with some shine. I love this quote- the words are perfect, the calligraphy is beautiful. You can get it too at Quietfire Design.
After stamping, I die-cut around it, then sponged the edge with Distress ink. I die-cut white card stock so I could split that piece and mat behind the stamped piece. The snowflake was die-cut, assembled with foam tape between the layers and painted with Super Sparkle.
Distress ink was sponged all around the outside edge, then more Super Sparkle was dotted onto the center of the scrolls on the design paper.
Here's a little close-up so you can really see the shine.
 
Quietfire Design has a great sale on now- go see!
 
Thanks for stopping by and have a wonderful day!


Tuesday, November 20, 2012

A CHRISTMAS BUNCH

The fake snow was flying along with the ink and stamps over the weekend. A few hours, some snacks and lots of laughs and we all built up our Christmas card stash.


Spending time with friends and flexing some creative muscle. Does it get any better?
 
Thank you for looking!


Monday, November 12, 2012

A CARD & A PEEK

The snow has arrived. I like how it brightens up a grey day. Speaking of bright, this card full  of ornaments has bright splashes of colour and shine. After embossing, a lot of chalk was applied to deepen the colour. A layer of Crystal Effects was added to each ornament shape and a silver gel pen coloured in the hangers and edged the oval. The 'noel' stamp from Textured Holiday Words from Quietfire Design was stamped, punched out and attached with foam tape. A little bling and done!
 
Now, here's a little peek for you.
 
CLICK HERE to see the full project at Quietfire Creations.
 I hope you enjoy it and have a wonderful day!
 
Thanks for stopping by!

Wednesday, November 7, 2012

THREE TO SHOW

I want flat, easily mailed cards this year and today's offerings fit the bill.
When they go together quickly too, that's a bonus.
This one would be easy, peasy to make multiples of.
 
Thanks for looking!


Tuesday, November 6, 2012

CHRISTMAS CARDS

It's that time again- past time almost.
Time to get going with the Christmas cards.
The die and embossing folder are from Stampin' Up!
Here's a couple to check out- more tomorrow!
The ornament die and holly stencil both came from Quietfire Design.
 
Have a wonderful day!


Thursday, November 1, 2012

ONE LAYER SAMPLES

After some chit chat with some design team friends, I was inspired to play with this masking technique. One is random stamping over the edge of a scallop circle punch out-Noel. The other is stamped more evenly using a marked circle punch out, and then randomly stamped red flakes-joy.
Robyn mentioned Burnished Velvet, a glitter technique and so that had to go the sample as well.
This is the scallop punch out after the stamping and sponging was done. The 'berries' are fired brick ink mixed with a little sparkle paint and dotted on with a stylus.
This shows the set up for the 'joy' sample. The lines on the circle are the guide to line up the center of the stamp, which is marked on the acrylic block. The green masking tape shows me how far to ink up the stamp so I just get the flourish inked and not the star. This would work well with an oval shape too. Any shape you like.
The stamps and inks are from Quietfire Design.
 
Just an idea for making a single layer card which goes through the mail easily.
 
Thanks for looking and I hope you give it a try.


Thursday, October 25, 2012

GO FOR THE DOUBLE!

FREE rubber stamps!
That sounds really good, doesn't it?
Quietfire Design is making it incredibly easy to enter for a chance to win free rubber stamps.
Click on Quietfire Creations to find out how easy. Even easier, double up for two entries!
So, click now and follow the easy steps. You could win!
 
 
Lately, I've been captivated by CAS cards. Clean and simple. I love the look but have discovered they're not that easy to do. This is my attempt at a very simple, no layer or one layer, depending on your point of view. :)
The tree was stamped with Distress Peeled Paint ink and the MC was stamped with Distress Aged Mahogany. Stamps and ink are from Quietfire Design.The sequin came out of my stash.
Now the critique...
I like this card, however, with CAS stamping it is important to get placement and balance correct. This card isn't balanced due to the images being a tad too low. I will correct this by trimming a bit off the top of the card, but left it to show you how important placement is. I'm also going to keep trying.
 
I hope you have a fabulous day!
Don't forget to go and enter to win free rubber stamps and thank you for stopping by.


Sunday, October 21, 2012

QUIETFIRE BLOG HOP WINNER & CARD

And the winner is....
 
Max, who said,
 
"These blocks are lovely. The stamps look great! Now I know how to use up my leftover stamp blocks. Thank you for the great idea."
 
Thank you Max, for joining us on the blog hop. From the Quietfire Style blog you can contact Suzanne and she will look after you.
 
I appreciate everyone stopping by for the hop and leaving such great comments.


Here is a card showing another beautiful Christmas stamp from Quietfire Design.
This single layer card was created by  masking off the sentiment, stamping the holly leaves and  sponging along the edge. The masking was removed and sparkle was added with a gel pen.
Easy  peasy and great for mailing.
 
 
Have a fantastic day and thanks for stopping by!

Tuesday, October 9, 2012

CHRISTMAS GRAFFITTI

Yes, I am stuck in Christmas mode at the moment. It's that time.
This card is quick and easy and would go through the mail well. The poinsettia is stacked designer paper attached with glue and distress stickles applied to the center, so no metal parts at all.
The graffitti background features Christmas stamped in red which draws attention to it.
Easy peasy!
These fabulous word stamps are from Quietfire Design- love them.
 
Have a super day and thank you for looking.


Saturday, October 6, 2012

ALPHA INSPIRED CHRISTMAS

Check out the alphabet stamps on this card- aren't they gorgeous! I hope you like them too because I have plans for many more beautiful words.
At this angle you can see the shimmery flourish used.
The designer cardstock appealed to me because it resembles a strip technique without me having to do the work. I did add the red text strip though because the art that was there was alphabet letters and it really interferred with the beautiful alpha stamps.
The stamps, designer paper, inks and shimmer paint all come from Quietfire Design. If you haven't checked it out yet, do. She has a fantastic selection for us.
 
Happy Thanksgiving everyone. I'm grateful for your visit.


Sunday, July 29, 2012

CHRISTMAS IN JULY BEFORE & AFTER


This the before card. Not bad, but lacking somehow. It wasn't until I began this post and I took a look at it here, that I could see what it needed.


I'm happier with the after card. The ornament has a little more visual impact. I think I need to
re-position it a bit higher on the card though.

Here's a closer look at the shimmer.

So, it's begun- Christmas cards. It's not just here either as I am seeing them being posted all over the 'net. I haven't been doing my '25th day of the month' Christmas cards lately so it's time to start again. The words and holly stamp are a set from Quietfire Design.

Thanks for looking and have a wonderful day!


Wednesday, November 23, 2011

THE STAR

Please note that the Monday Muse Technique Tag session has been cancelled. Look for it again in January.

Before I finished this card, I showed it to my husband. I had been struggling with it, had no desire to abandon it and he knew it. He took a look and told me it needed a star. So, I went back to the table, put a rhinestone on the tree top and showed him again. "Not what I meant" he said. "It needs a star that radiates out." Eep! I don't think I have that. However, Come to Bethlehem stamp set has a star. Done!
This from the guy who claims to NOT be creative-seriously.

Thanks for looking!

Thursday, November 17, 2011

ALMOST WHITE ON WHITE

Pure white on white would be without any coloured card stock so this is close.
Again, certain times  of day or weather cause blue tinting on my photos, especially white content. I hope you can see it white, not blue.

Plenty of white outside today...it's really here.
Have a wonderful day- I hope you get creative and let some art out!
 It's good for you.