Welcome!

This is my place to share my creative bits and pieces. My art has no rules, no limits and absolutely no order. My projects change with my moods but for the last few years, my main focus has been paper art. Cards, collage, mixed media and as many techniques as I can get to. My inspiration comes from everywhere.

I hope you enjoy your visit.


Showing posts with label recycling. Show all posts

Wednesday, November 27, 2013

NOEL CARD -NO STAMPING

Hi Everyone!
No stamping at all on this card but the papers have been cut four different ways. I only realized that after I photographed it. The red foil paper was cut with my paper trimmer to form the background and narrow strip. The red foil paper is recycled from Christmas crackers we had at our table one year. It is subtly embossed- it came that way. I embossed a piece more heavily with a folder and it broke the foil, leaving white cracks everywhere. Not so pretty.
The 'chain' strips were cut using a die and my Big Shot machine. That's two!
 

The green accent flowers were punched using two sizes of six-petal flower punches, stacked and beads added. My favourite element is the word NOEL, cut with my Silhouette Cameo machine. The beautiful cut file is from Quietfire and for sale on Silhouette's site HERE.
 
There you have it- four ways of cutting paper and a little recycling added in.
I plan to share this at Cards in Envy for their "punch it" challenge.
 
I encourage you to check out the links and get inspired!
Thanks for stopping by and have a wonderfully creative day.
 

Tuesday, May 28, 2013

JUTTA'S PERFECT TIMING & GREAT PROJECT

Recently, my friend Jutta posted this on her blog Crafty Gal Creations
 
I was immediately inspired to make one of my own. Her timing was perfect because I finally had a few rolls of tape that needed easy access storage. I began with a waxed paper dispenser box, removed the core tube and opened out the box so it laid flat.
Then I chose some gelli print papers, stamped on them using Quietfire Design and Magenta stamps (all Canadian content), and proceeded to glue it all down.
 
Then I put the box back together, and made a title (label) for the front of it.

I love how it turned out and I'm so glad Jutta shared her idea.

I added a strip of clear plastic (recycled from other packaging) and attached it to the front of the box so the tape will release easily. A couple covered elastics slip over the ends to keep the flap closed when I'm not using it.
I've also made my own designer tape and this type of storage would work for it as well. The long strips would lay the length of the box. I guess I know what will be next on my work table. :)
Thanks Jutta!
 
And thank you for stopping by!


Friday, September 14, 2012

GREEN MOSAIC CONVERTIBLE

Green mosaic convertible?
No, I haven't lost my mind but I don't blame you for thinking so :)
GREEN- re-use or recycling. You'll see how.....
MOSAIC- made with rubber scraps, leftover from trimming stamps, then glued to a small scrap of wood to make a permanent background stamp.
CONVERTIBLE- the narrow front panel can easily be removed from the card and converted into a bookmark.
Speaking of bookmarks, the stamp is from a set called Quote Marks. There are several sets and this stamp is from the Friendship set.
So, there you have it- green mosaic convertible.
 
Have a wonderful day and thank you for looking!
 

Monday, July 23, 2012

MILK JUG BUTTERFLIES

It's a win, win! I get the benefits from drinking the milk, then I get a free material to create with.
 I love that!
This mobile was super simple. Just cut out the butterflies and flowers with the Big Shot, punch a few holes in them, then crochet a chain, including the butterflies. This would make a pretty garland too- I may do that with the leftovers.
I kept this project very simple. You could emboss, punch more holes, add colour etc, etc.No limits.
The flower shaped ring was a welcome find at the Thrift Store. I wrapped it with ribbon then tied the butterfly strands on. A few smaller pieces of ribbon tied on and that's it! Easy peasy.

I'm currently saving my laundry detergent bottles, so we'll see what they become.

Enjoy your day!
Thanks for looking.


Tuesday, May 22, 2012

BOOK BUILDING BINGE

There are so many ways to make books and I have a made a few over the years, from post-it note books to small photo albums to funky art journals. This book was inspired by a youtube video. Type Jennibellie into the search bar and you can see lots of the great stuff she does. She recycles!
I liked the way she bound the signatures- she was using greeting cards- so decided to give it a go.

I used a heavy weight card stock for my pages. This will become an art journal so the weight will withstand the paint and glue quite well. It's about 6x8 inches with a 3inch spine.
I enjoyed making it so much and had lots more card stock and decided to recycle a bit too.
These are 4x6 inches with a 1inch spine. The covers and spine are made from cereal boxes that I first used as scratch paper under other projects. All kinds of paint and inky goodness there.

I hope you get some playtime today or at least some youtube time.
Have a GREAT day!


Sunday, April 10, 2011

TEXTURE PLATES FROM SCRAPS

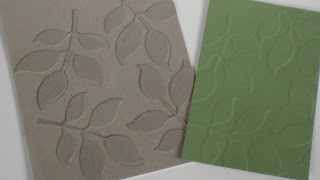
More recycling for you today. These homemade texture plates use chipboard from food boxes and any kind will work for you. Cereal, chips, whatever. For this one, I used the lattice die and cut one from the chipboard, glued it down to another piece of chipboard and let it dry. Then made the stack, including the silicone pad and ran it through my Big Shot machine. It embossed beautifully!  Here's another...
Totally from scraps as I cut the scraps into triangles and glued them down. And....


I have one more to show you and it's a little different because it's using the negative (or frame) of the plate above.....

The resulting empbossed image is a little sharper when using the negative.

I hope to have finished samples for you soon but in the meantime, cut up those cereal boxes and make some  texture plates for yourself- it's fun!
I'll post the website where I saw this first, once I find it again.
Edited to add:  This is where you will see more samples and she has a very complete tutorial on these.

Hope you can find some playtime soon.


Thursday, April 7, 2011

THIS IS HOW WE ROLL........

Anyone who lives here knows that this is a rite of Spring.....snowblowing the snowpiles to hurry them along.
Look at this day we're having! Beautiful sunshine and look....crocus coming up at the corner of the house. Love that!
After my lengthy absence I have a crafty thing to show you.
How about another transformed box? Sorry, I don't have a before photo for you. This little box of drawers was covered in blue floral fabric. It was what I was using before I transformed the pink jewelry box. I coated it with white gesso, mod podged book pages over it and then added a layer of napkin. The napkin is white with the flourishes on it.A bit of ink to add colour to the front edges and some buttons on the bottom for feet. The pull tabs were punched tags, covered and glued to the underside of each drawer.  Cute and easy peasy, which by now, you all know is how I like to roll.  :)
Enjoy this treat of a day!


Saturday, March 5, 2011

GLUE, PAPER AND PAINT...OH MY!


While at the Thrift Store last Wednesday, I picked up this sweet little pink jewelry box, perfect for upcycling.
That evening, I peeled away the glossy pink paper. I wanted any glue or paint I used to really stick so the gloss had to go. This took a couple hours while watching tv and was messy too 'cuz the stuff would flake instead of peel- ugh!
The next day I began covering it with dry embossed and punched pieces of card stock. I also glued on thin paper to reinforce corners or any areas that were weakened by stripping the pink layer away. Then I painted the outside with the blue paint. Once dry, I gave it a wash of tan paint and rubbed off the excess leaving tan paint in the recessed areas. Once it all dried, I measured and cut the fabric I wanted to use for lining. It was then I decided I wanted to remove the tray and the metal hardware holding it. I should have done this FIRST but at that point I still wanted it the way it was. So, I very carefully used pliers and patience to remove it without destroying the outside. Whew!

This is how it looked yesterday. I added dividers to the tray and bottom of the box, then covered all of it with fabric and gloss Mod Podge. The lid has hooks across the top for necklaces and the ribbons will hold rings and pins.
Today I looked at it and decided to change it again. Just added some burnt umber paint to the outside, wiped some away and once dry the entire box was rubbed with waxed paper. Thanks for that tip Jutta! This not only gives it a satiny finish but protects it as well. It sits on my bathroom counter. Here's the finished product---


One last detail for you- the tray holds my earrings. The foam bases that come with decorative brads are perfect for stabbing my post earrings into.

So, that's what I've worked on lately. Fifty cents and a little play  work and I have a new little jewelry box.

You gotta like that!

Thanks for looking and have a wonderful weekend!

Wednesday, February 9, 2011

SCRAP-CYCLING

Scrap-cycling-  my word for using scraps and recycling. In this case, the 16x16 base is a canvas that had a wine photo on it and was sitting in a clearance bin. It had to come home with me. I decoupaged black tissue paper to the whole thing, purposely leaving small wrinkles in it. Then, I pulled out my drawer filled with leftover technique samples and used my 1 1/4" square punch to make all same size squares. I used my 3/4" square punch on the smaller pieces and that used up the samples quite well. I have other plans for those smaller squares.
Here's a closer look at the canvas.

I attached the squares with a small piece of double-sided tape so I can easily switch them out if I want to. They aren't perfectly lined up so as to not be too rigid but that may change if I decide to attach it all permanently.  This is just a beginning idea with lots of potential. I'd bet you could build on this idea easily.
Go for it!

Saturday, February 5, 2011

BIRTHDAY BOY

Now that he has received it I can show you my son's birthday card. See the "checkerplate"?  ( I think that's what it is called) It's made from a pop can. Cut out and embossed with the Big Shot. Great look!

It's the weekend. I hope you have lots of creative play time and lots of R&R. For some of us, that would be the same thing  :)
Thank you for coming by.

Thursday, February 3, 2011

SCRAPPY SAMPLE

The purpose of this card si to show you a stamp I made from rubber scrap. After pushing out the die cut stamps there is a frame of rubber left behind. I found pieces to cut new stamps from, using the Big dies and my Big Shot machine. I have some other stamps to show you as well.
As you can see, not all the stamps are fully whole. The flower on the top right mounted on wood, and circle on the acrylic block and the flower I used on the card above. They work well stamped just off the edge.  You can see on the small paper sample how they look inked up and stamped.
You could use the stamp with the dies, to compliment each other. I should have included the die cuts on my sample card....maybe next time.

Have fun with your scraps. This only the beginning of things you can do with them.

Saturday, January 29, 2011

FOUR DAYS LATE, BUT HERE IT IS!

Today, I remembered that I was going to try to post a Christmas card on the 25th of each month. I wonder how many months I will forget :)   I got  a little heavy handed with the vanilla spritz, which is no surprise to me as I've yet to feel in control when using it. The eyes are the tiny pearls from Stampin' Up! I love those pearls and rhinestones!
The deer are from a piece of wrapping paper I received a gift in. Thanks Lorraine!

Enjoy your weekend and thanks for looking.

Tuesday, December 7, 2010

O CHRISTMAS TREE - UPCYCLED

More Thrift Store finds- a beat up foam tree and little jars and baggies of broken jewellery. Add a good tacky glue and the result is this Christmas tree decoration. Not to everyone;s taste I'm sure, but I love it!

Here it is a little closer and turned a bit.
Time consuming? Yes, but the evenings are spent watching tv so the hands keep busy. I have a couple smaller cones, er, 'trees' that I hope to get to soon.

Next up, the cards we did at the card camp last Sunday.
Thanks for stopping by!

Thursday, June 10, 2010

THRIFT STORE FIND

I checked out the fabric section of my local Thrift Store last week and found a lovely chunk of the beautiful sunshine yellow knit. Even better, it was half price as they were having Customer Appreciation Day. We have a terrific thrift store in this town!
After a few minutes with the Big Shot and a few more with beads, I had these summery flowers.
I'm calling it a recycle project since the fabric had been previously owned.

Tuesday, May 4, 2010

Got some burnin' love going on here!

They are everywhere online it seems! Google 'making singed flowers' and
see what you get- lots! These are fun to make- easy too.
They satisfy on so many levels- they're green, yay for recycling, you can
'play' with fire as you use a candle for some of them, you can watch a
flat circle of fabric transform right before your eyes.

I'm not giving directions for these as there are so many great tutorials already, but I will tell you that a bowl of water close by is a must- anytime you work with an open flame.

Some fabrics will curl nicely with the use of your heat tool- no flame required. Do a test scrap before starting your flower.

Most of the tutorials show the flowers being used for headbands and pins but they are very pretty on cards as well. Just hand deliver them :)
So go back into that box of clothes for the thrift store and pull out some synthetics. I think I'll try some with petal shapes cut into the circles......
Have a great play day!

Sunday, March 21, 2010

INVITING THE SENSES

This piece was so much fun to create, I can't wait to do another. Each circle has texture, both visual and physical and is built on a CD. So, yes, another recycling art project. I love those!
There are/is- scrunched tissue paper, crumpled brown bag, beads, jewelry pieces, chipboard, jute twine, punched cardstock, buttons, embossed cardstock, woven brown paper and flocked designer paper. Some paint, lots of adhesive and sealer. You can't help but want to touch it.
I really need to do this again. Maybe with lots of bold and bright colours!
What do you think?

Thursday, March 11, 2010

ATC Time


Artist Trading Cards. These 2.5 x 3.5 inch little cards are made for sharing. They are also a great way to change gears mentally and are a green craft. I love projects that recycle or repurpose and a lot of my ATC's do just that.
These ones are using bits from other projects I've done and I played a bit with doodling.
For me, ATC's are relaxing to make and so much fun to trade. A small group of us get together each month to create and trade our ATC's.
If you'd like to try them and want more information, you can find a lot online: Google-artist trading cards. I'm happy to try to answer any questions as well.
I hope you try them!