Welcome!

This is my place to share my creative bits and pieces. My art has no rules, no limits and absolutely no order. My projects change with my moods but for the last few years, my main focus has been paper art. Cards, collage, mixed media and as many techniques as I can get to. My inspiration comes from everywhere.

I hope you enjoy your visit.


Showing posts with label shimmer. Show all posts

Sunday, December 2, 2012

MERRY CHRISTMAS SNOWFLAKE

One of my favourite things about the new Snowflakes are the Buttterflies stamp set from Quietfire Design is the snowflake Merry and Christmas stamps. They go together perfectly to create a very delicate and pretty snowflake.
This card has a circle stamped background. So easy peasy and you make it exactly as it sounds. My circle stamp is a die-cut fun foam stamp and it works great with Distress Inks.
You can see the light spritz of shimmer spray in this close-up.
Here is a card I previously posted using the same circle background technique, done the same way with the same fun foam stamp.


Thank you for stopping by!


Saturday, May 14, 2011

LET'S TRY.......A TUTORIAL!


A very good friend wanted to know how to do Shimmer Watercolor, so I thought I would try to do a tutorial. This could work well or be a total flop but you are all my guinea pigs today so here we go......

Use a dye ink to sponge on colour. I chose to apply it diagonally this time but it can be straight across stripes, blocks of colour, whatever you choose.

Once inks have dried thoroughly, use your heat gun if you like, clear emboss using a stamp of your choice, Versamark ink and clear embossing powder. 

To create the shimmer watercolour, add a couple drops of champagne ink to a puddle of water. Stir it up and add a drop of blue ink to the puddle. Mix it in and paint it over the blue section you sponged earlier. You don't need to be neat and tidy with this, just get it on the cardstock. Then mix a drop of green ink into the champagne puddle and brush it onto the cardstock.


You can dab away larger drops or just let them dry. Once dry, wipe over the clear embossed areas with a damp cloth. This removes ink from the image for better contrast. This is a subtle colour pairing and your results will be different with every chage in colour.

I wanted the pieces to be a little darker so I did the puddle and ink again. On this card, I added more shimmer ink to punch up the shine. You have lots of choices with this technique.
This technique is very experimental and you can create some amazing backgrounds. 
 I hope you try it using what you have for colour and shine.

With the second piece, I decided to overstamp with a darker ink and again wiped away any excess on the embossing.

Whew! Done!
IF I do another I must remember to take way more photos.

Have a great weekend!

Thursday, March 24, 2011

SMACKIN' & SMOOCHIN'

Remember the Smackin' Acetate technique? Never gets old for me. After letting the inks dry, I embossed then sanded the glossy cardstock. This gives white lines and a slightly shabby chic/distressed look.
Once the card was assembled, I took the Smooch Moonlight Accent Ink and filled in the circles.
The overall effect is dingy bright with a touch of shimmer- sounds fine doesn't it?

It has been one week since I last made a card- absolutely unheard of   :)   I've been crocheting a bit and making ATC's, so still creating, just no cards. Today, I made two. You'll see the Christmas one tomorrow.

Have a wonderful day!

Wednesday, March 2, 2011

SHIMMER ADDICTED?

At the moment, I appear to be shimmer addicted, and I'm not looking for the cure. This card has more of the shimmer spray and re-inker painting done on it. No promises that I won't be making more with shimmer but I'll find a different technique.  :)
Thanks for looking and I hope your day rocks!

Sunday, February 27, 2011

SHIMMER ROSE

Another example of painting in the design using re-inkers and Smooch shimmer spray, after clear embossing the image. The green strip was inked, dry embossed, inked again and sanded.
All supplies used are Stampin' Up!

Have a good Sunday and thanks for looking.

Monday, September 13, 2010

CHRISTMAS CARD CAMP

Another fun time with some great stampers and a few more Christmas cards for the stash.
Rich razzleberry-yum! Once the ink dried, champagne shimmer ink was sponged onto the punched ornament for a super shine. Just love that shimmer ink.
A little bit of vintage, or maybe shabby distress? Just a few punched pieces, sponged ink and pearls- oh my!

Basic stamping, marker inking and embossing with a stencil.
Simple, quick and mailable.(is that even a word?)
No card camp would be complete without a snowflake somewhere and this card has one with bling.

That's all for now.
Be sure and have a wonderful day!

Saturday, September 11, 2010

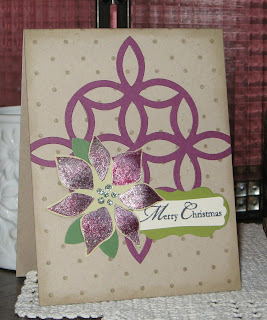
RAZZLEBERRY SHIMMER

A  little Razzleberry goes a long way. A drop from the re-inker added to a couple drops of champagne shimmer ink-  and the poinsettia gets an amazing coat of bling. On this card, I added the shimmer mix with a brush after stamping it. Another way would be to sponge the mix onto the stamp- the look is a little different- I'll show you sometime, but it still has lots of shine.
Speaking of shine-the sunshine was fantastic today, and so warm. I hope there's a lot more to come.
Have a great day!

Tuesday, August 24, 2010

GET YOUR SHIMMER ON!

 No need to wait for Christmas or weddings to get your shimmer on.
Pull out the bright colours and go for it!