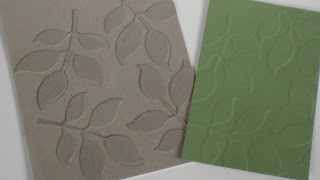
Changed a couple settings on my camera- better?
Welcome!
This is my place to share my creative bits and pieces. My art has no rules, no limits and absolutely no order. My projects change with my moods but for the last few years, my main focus has been paper art. Cards, collage, mixed media and as many techniques as I can get to. My inspiration comes from everywhere.
I hope you enjoy your visit.
I hope you enjoy your visit.
Saturday, April 30, 2011
Friday, April 29, 2011
EMBOSSING FOLDER BUT NO EMBOSSING
That's right! The main image used the embossing folder more like a print maker- no embossing required. This technique first came about using texture plates but the embossing folders work too.
To do this, open the folder and 'feel' the side where the design is a depression, then swipe ink pads across it. Then, spritz the folder with water- I also spritzed a pearl spray- lay your card stock on the folder, lay scrap paper over it and rub all around with your hand making sure that all the cardstock comes into contact with all the folder. Or you could use your brayer. Peel off and let it dry. It will flatten as it dries.
Hint* -you can speed drying time using your heat tool but you do risk warping the cardstock and/or fading the ink that way. Make up the rest of the card while waiting for it to dry as it doesn't take too long.
Again I'm sorry for the photo quality (or lack thereof) and hope to spend some time 'learning' my camera.
This pretty little card will go into the mail to my Mom. It will be in a box along with a portrait of my sons so the curled corner should survive the trip.
I see sunshine for the moment, you know who won the hockey game and you know who else got married today. It's all good.
Tuesday, April 26, 2011
A DAY LATE
If you're looking for a quick and easy card- perhaps you want to make LOTS of them, then this is a good formula. Mask an oval or rectangle in the center of your card base, then stamp all around it. Remove the mask and stamp your greeting in the center. A quick touch up with a marker, a spritz of Smooch and you are done. One, or a stack, a timeless design for any card.
I am trying to work on some art pieces for upcoming shows at our gallery, which cuts into blog time. If you are still hanging in with me, thank you. Have a great day!
Thursday, April 14, 2011
Sunday, April 10, 2011
TEXTURE PLATES FROM SCRAPS
More recycling for you today. These homemade texture plates use chipboard from food boxes and any kind will work for you. Cereal, chips, whatever. For this one, I used the lattice die and cut one from the chipboard, glued it down to another piece of chipboard and let it dry. Then made the stack, including the silicone pad and ran it through my Big Shot machine. It embossed beautifully! Here's another...
Totally from scraps as I cut the scraps into triangles and glued them down. And....
I have one more to show you and it's a little different because it's using the negative (or frame) of the plate above.....
The resulting empbossed image is a little sharper when using the negative.
I hope to have finished samples for you soon but in the meantime, cut up those cereal boxes and make some texture plates for yourself- it's fun!
I'll post the website where I saw this first, once I find it again.
Edited to add: This is where you will see more samples and she has a very complete tutorial on these.
Hope you can find some playtime soon.
Thursday, April 7, 2011
THIS IS HOW WE ROLL........
Anyone who lives here knows that this is a rite of Spring.....snowblowing the snowpiles to hurry them along.
Look at this day we're having! Beautiful sunshine and look....crocus coming up at the corner of the house. Love that!
After my lengthy absence I have a crafty thing to show you.
How about another transformed box? Sorry, I don't have a before photo for you. This little box of drawers was covered in blue floral fabric. It was what I was using before I transformed the pink jewelry box. I coated it with white gesso, mod podged book pages over it and then added a layer of napkin. The napkin is white with the flourishes on it.A bit of ink to add colour to the front edges and some buttons on the bottom for feet. The pull tabs were punched tags, covered and glued to the underside of each drawer. Cute and easy peasy, which by now, you all know is how I like to roll. :)
Enjoy this treat of a day!
Subscribe to:
Comments (Atom)


