Welcome!

This is my place to share my creative bits and pieces. My art has no rules, no limits and absolutely no order. My projects change with my moods but for the last few years, my main focus has been paper art. Cards, collage, mixed media and as many techniques as I can get to. My inspiration comes from everywhere.

I hope you enjoy your visit.


Tuesday, May 28, 2013

JUTTA'S PERFECT TIMING & GREAT PROJECT

Recently, my friend Jutta posted this on her blog Crafty Gal Creations
 
I was immediately inspired to make one of my own. Her timing was perfect because I finally had a few rolls of tape that needed easy access storage. I began with a waxed paper dispenser box, removed the core tube and opened out the box so it laid flat.
Then I chose some gelli print papers, stamped on them using Quietfire Design and Magenta stamps (all Canadian content), and proceeded to glue it all down.
 
Then I put the box back together, and made a title (label) for the front of it.

I love how it turned out and I'm so glad Jutta shared her idea.

I added a strip of clear plastic (recycled from other packaging) and attached it to the front of the box so the tape will release easily. A couple covered elastics slip over the ends to keep the flap closed when I'm not using it.
I've also made my own designer tape and this type of storage would work for it as well. The long strips would lay the length of the box. I guess I know what will be next on my work table. :)
Thanks Jutta!
 
And thank you for stopping by!


Monday, May 27, 2013

FABRIC PAINT & WATERCOLOURS

Yesterday, I showed a card using fabric paint to outline stamping. Today, I have a card that uses fabric paint to outline embossing. I embossed the cardstock with roses, then used gold fabric paint on all the raised lines and left it overnight to dry.

I painted the roses using metallic watercolours. By nature, they are sheer colour so many layers of paint were required. That also created depth. The beautiful calligraphy style of the Quietfire Design stamp finishes this elegant card. I'm really pleased with how this turned out and can see more of these in the future.
 
Thanks for  looking and  have a wonderful day!
 

Sunday, May 26, 2013

ONE THING LEADS TO ANOTHER

While making background papers with my gelli plate, I thought I'd like to make some larger stamps from craft foam, to use during my next background paper making session. The leafy branches used on this card is one of those stamps. The paper it's stamped onto, was made with the gelli plate. Since it was midnight, and the gelli plate was all cleaned up and put away, I decided to just stamp with it, and use it with the gelli plate another day. I sponged fabric paint onto the stamp, then stamped on the paper. After that, I used to the fabric paint to outline the leaves and add a few swirls.]
This morning, I decided to make the card using this great stamp from Quietfire Design.

You can see the main quote on the inside of the card.
 
***
 
During my cleaning frenzy last month, I came across a few paint bottles that had dried out and it inspired me to use more of my supplies than ink and stamps. Thus, the fabric paint. I'll have another sample for you in a day or two.
 
Thanks for looking today!
 

Friday, May 24, 2013

FABRIC JOURNAL COVERS

A couple months ago, I started handstitching little quilted pillows, and stitching them together to form book covers.

This one has narrow pockets to hold pens. The paper can be removed and/or added to.

This book has pockets front and back.

It also has binder clips to hold the spiral bound sketch book.
 
I came across a video by Teesha Moore and saw how she made these little pillows.
 You can access it from HERE.
There are four videos in all and her work is so inspiring, you'll want to try it too. I love the freedom with this- no rigid patterns or designs. No rules art- my favourite. She does use a machine to start her pillows but I chose to make mine totally hand-sewn. This is also a great portable craft. I stitched during many car trips. Added beads and embroidery while watching TV in the evenings.
A big stack of quilted pillows became a tote bag.
 
Lots of possibilities.
I hope you enjoy the videos by Teesha Moore. All of her art is inspiring.
 
Thanks for looking!


Wednesday, May 22, 2013

BIND IT ALL NOT FOR SALE

Once again, I had a thought about selling something I rarely use.
My Bind It All. There are so many fun ways to bind books and journals that I was ignoring it.
Then, I had a look on Pinterest. (love, love, love Pinterest)
I found THIS board and was inspired to create a ribbon hanger.
 
 
I covered mat board with designer paper then punched all along one edge with the BIA.
I clamped it into a pant hanger, inserted the O-wire and proceeded to hang my ribbons.
I had a package of clips that work perfectly with the loose ribbons.


The first hanger has two strips clamped in for two rows to hang ribbon from. I made a third strip but it was too heavy for one hanger so I clamped it into another hanger. I may have to make a fourth strip to double up the second hanger.

It's very easy to find and retrieve any of the ribbons. If it isn't easy access, I won't use it, so I'm very pleased with how this turned out. Definitely keeping my Bind It All.
 
Hope you enjoyed this project and thanks for stopping by my blog.

Friday, May 17, 2013

AIR BRUSH & GELLI PLATE ART JOURNAL

The conversation went something like this....
"I never use my airbrush anymore. I should sell it."
DH- Let me know and I'll take a photo and list it.
"Maybe I should try it out and make sure."
Later.....
"Look at this. I love it!"
DH- rolls his eyes. 'Nuff said.
 
With black paint, I sprayed over punchinella, doilies and die cuts. Changed to red paint and sprayed over die cut flowers and all around the edge. Changed to yellow, then blue, and sprayed here and there. Brushed on clear coat and let it dry. Click on photo for larger image.

The back side of the cover had red paint sprayed through a plastic doily, then tissue paper was glued down over it, allowing bits of red to show through. The tissue was a scrap used to stamp off and roll off paint while I was using my gelli plate. The following are random pages made with the gelli plate.

Left: dollar store scrapbook paper with flower cut outs.
Right: hand cut stencil that I made. Produce bag.

Paper doily, narrow ribbon trim.

Textured wallpaper scrap, die cut frame.

Same hand cut stencil.

Back cover sprayed with softer colours.
 
This art journal is about 8X10 inches and I'm itching to work in it.
 
I have a card to share at QUIETFIRE CREATIONS. Be sure and check it out okay?
 
Thanks for stopping by and have a wonderful weekend!
Stay safe.
 

Tuesday, May 14, 2013

ONE MORE RETIREMENT CARD

This card was made for Joan's staff to write in for her.
Again with the garden/flower theme.

The bouquet slides out for writing.

I added a small easel hinge to the back so it stands up.

Added some flowers to the envelope.
 
Thanks for looking!

Saturday, May 11, 2013

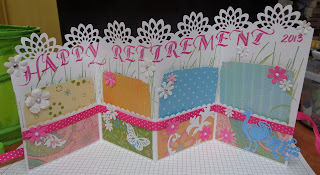
TIME TO RETIRE

A good friend of mine retired yesterday. She's energetic and amazing, brings out the best in people, and was once, my boss.  I can't wait to see what she does next!

I was asked to make a card that the adoring public could sign for her. This is what I came up with, and I am so glad to have Quietfire stamps at the ready. There were some perfect sentiments for the occasion.
Click on the photo to enlarge it to read the sentiments.
This card is 18" wide so you can see it would be fairly thick once folded. No envelope for this one.
 
It  gets it's very own box.
 
This was a lot of fun to make and my favourite thing is knowing the person I am making something for. I thought of Joan the entire time I was making this card and I look forward to more fun times with her. She loves to garden and blisses out to sunshine, so she chose a good time of year to retire.
Congratulations Joan - you are one of the best!
 
 
A quick update about me :)
DH and I finally have the house in a show-able state for selling. While waiting for the ONE that will fall in love with our home and buy it, I hope to get into lots of art and then share it with you. You can check it out on my other blog which is here- A VERY FINE HOUSE FOR SALE.
 
I've missed blogging here and look forward to sharing again. If you are still coming around-
THANK YOU SO MUCH!
 
Enjoy your day!